Friday 15 May 2020

INVOICE GENERATOR V2 USING EXCEL USERFORM

INVOICE GENERATOR V2


PRODUCT DESCRIPTION: -

We generate invoices on daily basis, what if we get the tool which is beautiful, fast and most importantly very easy to use for generating invoices.

From the suggestions we got from our first Invoice Maker and Tracker, we are here with another Invoice maker using Userforms.

FEATURES / FUNCTIONS: -

A)  Login Page

B)  Home.

C)  Add and View Customers.

D)  Add and View Products.

E)  Generate Invoice.

F)  Invoice Register.

A)   Login Page: -

To use the Software we need to first login with User Id and Password. This keeps our data secure and safe. 

B)   Home: -

     a) We can set the location to save the Invoice PDF Files, and,
     b) We can format the Invoice Template and customize it as per our need.
(Note: - Ensure to give proper references of cells after formatting in the option given on right.)

C)   Customer List: -

    In this tab we can add new customer which will be added to the list of customer shown below. We can DELETE (ALT + D) or can EDIT  (ALT + E) the customer any time afterwards. We can also search based on headers using the option given.

D)   Product List: -

    In this tab we can add new Products which will be added to the list of products shown below. We can DELETE (ALT + D) or can EDIT  (ALT + E) the products any time afterwards. We can also search based on headers using the option given.
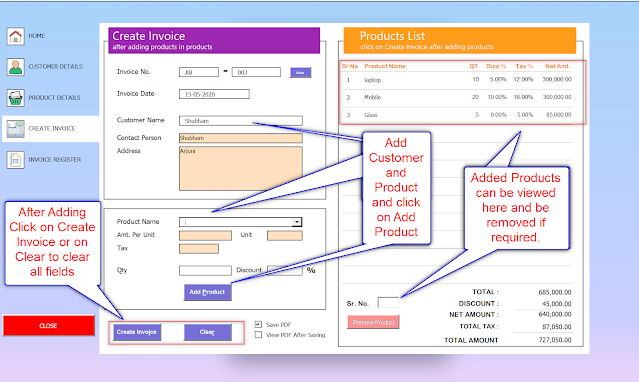

E)   Create Invoice: -

    In this tab we will generate invoices. 
  •     Just enter invoice number or press AUTO button to automatically generate the latest invoice number for us. 
  •      Enter name of customer. 
  •      Add name of products, enter quantity and discount (if any)
  •      Click on Add Product (ALT+P).
  •      We can see the products are adding on list on right side.
  •     We can also remove the products in invoice list, enter serial number and press remove product.
  •     After adding products click on Create Invoice (ALT+I) to generate invoice.

F) Invoice Register: -
 

    After generating invoices we can view the same in Invoice Register. Not only view but we can also Edit or Delete the same. We can also export the data in Excel for further analyzing.

NOTE: - Recommended to use in Excel 2013 or Later Version.

CONCLUSION: -
  • VERY EASY TO USE.
  • LOGIN REQUIRED (SAFE AND SECURE).
  • NO INSTALLTION (READY TO USE).
  • BEAUTIFUL USER INTERFACE.
  • FAST AND SMOOTH.
  • RECORD AND TRACK PAST INVOICE.
  • EDIT / DELETE INVOICE ANY TIME.
  • SAVE INVOICE IN PDF.
  • FULLY CUSTOMIZABLE FORMAT.
  • EXCEL BASED (THUS EASY FOR ANALYSIS)

If you want the above Template, please email us at feelexcel@gmail.com.

(Request you to Please  COMMENT)

You can also watch the Tutorial Video for how to use Invoice Maker v2: -

Icons Credit: - https://icons8.com/

Tuesday 28 April 2020

SAVE EXCEL IN PDF (ANY LOCATION) - MACRO / VBA


Namaste My Dear Friends!

I hope you all are doing well and Ready for another New Macro Thing.

In this blog we will write a macro for How to Save Excel file or selection in excel in PDF format at our desired location.

We'll cover this topic in 2 Steps: -

First, we will learn how to save the Folder Location in a cell in excel.


Second, how to save the excel in pdf at the location given in cell above.


Please refer the following Video for step by step tutorial: -


VBA Codes for: -

a) BROWSE

Sub Browse_Path()
Dim FolderS As FileDialog
Dim fPath As String
Set FolderS = Application.FileDialog(msoFileDialogFolderPicker)
With FolderS
    .Title = "Select a Folder" 'Title Set
    .AllowMultiSelect = False
    If .Show <> -1 Then GoTo Cancel 'Minimum 1 Folder should be Selected
       fPath = .SelectedItems(1)
    Range("G4").Value = fPath
Cancel:
    Set FolderS = Nothing
End With
End Sub


b) SAVE PDF

Sub Save_PDF()
    Dim flName As String, fPath As String, fPathfile As String
    Range("E1:N17").Select
    fPath = Range("G4").Value & "\"
    flName = "ABC.pdf"
    fPathfile = fPath & flName
    Selection.ExportAsFixedFormat Type:=xlTypePDF, Filename:=fPathfile, IgnorePrintAreas:=False, OpenAfterPublish:=True
End Sub


Thursday 23 April 2020

INVOICE GENERATOR AND TRACKER IN EXCEL (VBA / MACROS)


INVOICE GENERATOR & TRACKER


PRODUCT DESCRIPTION: -

In every business there is need to generate a invoice. Not only to generate and also to track the invoice whether the amount related to same received or not. Thus both Invoice generator and Invoice Tracker place a crucial role.

This product helps to Create or Generate Invoice and also helps in Tracking same  very quickly and easily by clicking a single button.


FEATURES / FUNCTIONS: -

A)  Dashboard

B)  Generate Invoice.

C)  Products / Services List.

D)  Invoice Register.

E)  Customer List.

F)  Invoice Tracker.

         A)   Dashboard: -


           1)    Generate Invoice: -
           Click on this button which will lead you to template where you can generate invoice.
2)  Add / Edit Product List: -
While generating the invoice we need to enter the products or services. We can add new or edit existing products or services by clicking on this button. 
3)  Invoice Register: -
Invoice Register button will lead you to records of invoice generated.
4)  Add / Edit Customer List: -
While generating the invoice we need to enter the name and other details of customer. We can add new or edit existing products or services by clicking on this button.
(Note: You can directly write the Customer name in invoice which will add automatically in customer details in customer list if not present already.)
5)    Invoice Tracker: -
Through Invoice Tracker we can easily track the receipts of amount in respect to each invoice.
6)    Location to Save PDF: -
In Invoice Generate template you can also save invoice in pdf. The location of same can be set here.

B)   Invoice Generator: -


This is the template where we can generate the proforma invoice or generate invoices. It includes the following functions: -

i)      Today’s Date: - This button helps to set the invoice data as of today. The “UP” and “DOWN” buttons beside helps to add and less date by 1.

ii)   No. Prefix: - You can set the invoice number’s prefix here which will help to set the invoice number automatically along with the prefix. “UP” and “DOWN” button add and less Invoice No. by 1.

Example: - Prefix set as “AY-” and if you press “UP” then it’ll set Invoice no. as AY-002.

iii)  Show / Hide Discount: - You can hide / unhide discount column as per your need.

iv)   Instructions: - You can hide / unhide instructions.

v)     Save PDF: - You can save invoice in pdf by clicking on this.

vi)   Record in Database: - Click here to record the invoice and its details in invoice register to track at later stage.

vii) Dashboard: - Click here to go to Dashboard.

viii)       Reset: - Click here to clear all the fields except Invoice No.

ix)   “+”& amp; “-”: - This will add or delete products / services row.

C)  Products / Services Details: -


When we’ll create Invoice, we need to add details of products or services for which we are creating the same. We can add new / edit existing Products or Services from this template. 

D)   Invoice Register: -


This template will show us the details of invoice already generated.

It also has the button “Detailed Register” which will show the past invoice along with the extra details such as products / services mentioned in invoice.

E) Customer Details: -


When we’ll create Invoice, we will add details of customer for whom we are creating the same. We can add new / edit existing Customer Details from this template.

You can also write customer details directly in Invoice which will then automatically add the details to Customer Details List if not present there.

F) Invoice Tracker: -

After creating invoice we can also track each invoice in respect to its receipt.
The invoice tracker shows the Total Invoice Amount, Amount Received and Outstanding Amount in chart and number form.
We can enter the data related to Amount received in Invoice Register template.


CONCLUSION: -

  • NO COST (ITS TOTALLY FREE)
  • EASY TO USE.
  • NO INSTALLTION (READY TO USE).
  • INVOICE GENERATOR AND TRACKER AT SAME TIME.
  • RECORD AND TRACK PAST INVOICE.
  • SAVE INVOICE IN PDF.
  • EXCEL BASED (THUS EASY FOR ANALYSIS)


If you want the above Template for FREE, please email us at feelexcel@gmail.com.

(Request you to Please RATE and COMMENT)


Friday 17 April 2020

QUOTATION MAKER / PROFORMA INVOICE GENERATOR IN EXCEL (VBA / MACROS)


QUOTATION MAKER


PRODUCT DESCRIPTION: -

In a regular day to day business activity it is very common practice to send a proforma invoice to our customers or clients. This helps the businesses to clear various elements such as price, terms, etc in prior.

This product helps to create or generate Quotation or Proforma Invoice very quickly and easily by clicking a single button.


FEATURES / FUNCTIONS: -

A)  Dashboard

B)  Quotations Maker.

C)  Products / Services List.

D)  Quotation Register.

E)  Customer List.

         A)   Dashboard: -


           1)    Generate Quotations: -
           Click on this button which will lead you to template where you can generate quotation.
2)  Add / Edit Product List: -
While generating the quotation we need to enter the products or services. We can add new or edit existing products or services by clicking on this button. 
3)  Quotation Register: -
Quotation Register button will lead you to records of quotation generated.
4)  Add / Edit Customer List: -
While generating the quotation we need to enter the name and other details of customer. We can add new or edit existing products or services by clicking on this button.
(Note: You can directly write the Customer name in quotation which will add automatically in customer details in customer list if not present already.)
5)    Location to Save PDF: -
In Quotation Generate template you can also save quotation in pdf. The location of same can be set here.

B)   Quotation Maker: -


This is the template where we can generate the proforma invoice or generate quotations. It includes the following functions: -

i)      Today’s Date: - This button helps to set the quotation data as of today. The “UP” and “DOWN” buttons beside helps to add and less date by 1.

ii)   No. Prefix: - You can set the quotation number’s prefix here which will help to set the quotation number automatically along with the prefix. “UP” and “DOWN” button add and less Quotation No. by 1.

Example: - Prefix set as “AY-” and if you press “UP” then it’ll set Quotation no. as AY-002.

iii)  Show / Hide Discount: - You can hide / unhide discount column as per your need.

iv)   Instructions: - You can hide / unhide instructions.

v)     Save PDF: - You can save quotation in pdf by clicking on this.

vi)   Record in Database: - Click here to record the quotation and its details in quotation register to track at later stage.

vii) Dashboard: - Click here to go to Dashboard.

viii)       Reset: - Click here to clear all the fields except Quotation No.

ix)   “+” & “-”: - This will add or delete products / services row.

C)  Products / Services Details: -


When we’ll create Quotation, we need to add details of products or services for which we are creating the same. We can add new / edit existing Products or Services from this template. 

D)   Quotation Register: -


This template will show us the details of quotation already generated.

It also has the button “Detailed Register” which will show the past quotation along with the extra details such as products / services mentioned in quotation.

E) Customer Details: -


When we’ll create Quotation, we will add details of customer for whom we are creating the same. We can add new / edit existing Customer Details from this template.

You can also write customer details directly in Quotation which will then automatically add the details to Customer Details List if not present there.

CONCLUSION: -

  • NO COST (ITS TOTALLY FREE)
  • EASY TO USE.
  • NO INSTALLTION (READY TO USE).
  • RECORD AND TRACK PAST QUOTAION.
  • SAVE QUOTATION IN PDF.
  • EXCEL BASED (THUS EASY FOR ANALYSIS)


If you want the above Template for FREE, please email us at feelexcel@gmail.com.

(Request you to Please RATE and COMMENT)